Every year I have gone to quilt show I have always been tickled by all the cute coordinating items other show "go-ers" have on. Every years groups of ladies visiting the show together have coordinating hats, vests, bags, or nametags. I thought in honor of Nancy's first trip to Quilt Market on Friday I would coordinate us!
Here is a tutorial for a "Dresden Name Tag Holder"
- a Quilters Crossing original! :-)
You will need: 4 rectangles for your bag measuring 6"x7"
( I pressed Shape-flex to the back side of my rectangles for some added stability)
9 different squares from a Bella Solids Charm pack
1 piece of clear plastic measuring 4"x6"
ALSO: 1 strip of fabric 2"x WOF and from that cut one 2"x 6" piece. Reserve the remainder of the strip for the neck strap of your name tag holder. Note: You can get all of your bag body, lining and strap made from 1/4 yd of fabric if you cut perfectly!
Also needed: a mini Dresden template-
I used a piece from this set by Marti Michelle:
This is the piece I used:
Cut your 2"x6" rectangle down to 1.5"x6". We will be pressing it in half lengthwise and then turning the long raw edges in to the center wrong sides in)
This will create nice clean edges all the raw edges in!
Take this and tuck the rectangle of plastic inside the fold and then stitch it down giving your plastic piece a cuff.
Repeat the same pressing and folding in of the long edges on the longer strip for your neck. This one you just run through your machine to keep those raw edges turned in.
Set both of these pieces aside while you work on your dresden.
First cut one dresden wedge from each of 9 different charm squares:
Next fold them in half lengthwise:
Like this:
And then sew across the fat ends of each wedge
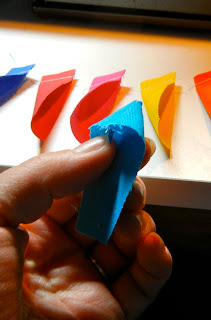
Then flip the seam inside and you get your little pointy dresden wedge! How cute is that!
Here is one:
Here they all are lined up ready to be pressed flat:
After pressing them each flat, sew them, right sides together, down the long wedge edge:
Keep adding them:
Until all are connected and form an arc
Press your seams open
This is what you have:
Place this on a 6" end of one of your 6"x7" rectangles as shown--You will want to displace it by about 1/4 inch to account for seam allowance as shown:
Applique in your method of choice: I did hand applique but machine would be fine:
Next hand applique a circle over the whole in your arc. I used the wrong side of a yo-yo so that all my edges were turned under:
Next place your plastic sheet with its cuff closest to your dresden on the bag front as shown:
If your cuff covers up the lower edge of your dresden trim the bottom edge of the plastic down until the cuff falls just beneath the dresden points. Next lay the back side of your bag (RST) on top of the front and pin.
Leave an opening at the top!
Sew along three sides leaving top open
Trim your seams to 1/8"
Flip right side out- be sure to poke out those stiff corners at the bottom! Next sew the other two 6"x7" rectangles together to form the lining- make sure to leave one 6" side open! Leave the lining wrong side out.
Next pin your strap on to the BACK of your bag body (not the lining)- on the outside as shown: Be sure there aren't any twists in your strap! I positioned mine about 1 inch in from each edge and placed the raw ends just over the edge of my bag.
I wrapped the neck strap around and tucked it into the pocket on the front to keep them out of the way while I sew the lining to the bag body:
Next, (with the lining turned wrong side out!!) tuck the bag body(right side out) into the lining as shown:
Pin around the top edge:
Sew around but leave an opening between your straps for turning:
Pull the bag entirely right side out (bag body and lining)
you should have this on the front:
and this on the back:
Now tuck the lining down INTO the bag body:
Hand or machine stitch your opening closed between the handles:
and Wha-lah!
A completely finished and lined nametag pouch to sport at quilt show or quilt guild:
Maybe make a couple for your co-workers too!
Hope Deb and Nancy like theirs!
Quilters Crossing has tickets for the show available now!
Stop in and purchase yours:
$12 for adults ( includes a preview nite pass)
$9 for seniors and students


