Sunday, January 29, 2012

New notions

We found a few new notions available from a couple of our suppliers so we thought we'd see if anyone was interested.
First we have Karen Kay Buckley's Perfect Ovals: comprised of multiple sizes of ovals to make your hand applique ovals have perfect edges. As all of her templates are, these are are made of a heat resistant mylar. 
Next Bias Bars: Make your own bias tape in multiple widths with these. Thinner than the plastic version, and therefore able to press into a crisper edged bias tape. 
Be careful though these babies get hot!
 Lastly, Sewline (our favorite brand for marking tools) have come out with a new TRIO pencil. Now they have the Sewline TRIO Colors with three different colors of lead in one tool- truly useful tool for almost anyone marking almost ANY quilt!

Friday, January 27, 2012

Boy! Are we ever glad...

that we had the sale and Open House last Saturday because we got a BUNCH of new things in this week and we needed some room!
We try to bring you nice fabric to make husband/boys/mens quilts because sometimes that can be challenging to find. We found this Boy Scout fabric from Quilting Treasures with its retro graphics and thought it was sure to inspire some of our customers.
 It has a panel:
Some panel detail shots:

And three coordinates:
Two Compass fabric and some stripes:
We also got our very first Asian line this week, it took us a while to find one we really loved but this one was just so lovely we had to have it:
 Fans are featured in the two focal pieces and Deb and I couldn't agree on which was prettier blue or beige so we got both!
 These soft feathers:
 Smaller scale fans:
 Coordinates:
Aren't they pretty! And with gold metallic!
We were sold.
Also in this week is a Lorelai line with Cupcakes!
It also has a panel:
 And several fun coordinates:


The other fabric line we got this week is also a debut for us as it includes some homespuns,  and paisleys in soft muted colors, it is called Buggy Barn:


We have kits for sale using 25 fat quarters from this line and have  sample in the works!
Lots of class sign-ups and many are filling up and have waiting lists so be sure to call soon to sign up!


Saturday, January 21, 2012

Thank you!

We had a great time today at Open House and hope you were all inspired by our talented teachers and enjoyed the sale!

We had several requests for my husband's recipe for Pulled Pork which we served in the classroom today so here goes!


Cary's Pulled Pork
1 pork picnic roast 5-8 lbs (bone in/skinless)
1 bottle Figaro hickory liquid smoke
3 cloves garlic (crushed)
2 T Black Salt (available at Penzey's ) or if you can't find that use 2 T kosher salt instead
1/2 tsp. Black pepper (freshly ground)
1/2 tsp garlic powder
water (fill the liquid smoke bottle as a measurement)


How:
Crush fresh garlic and put in the bottom of the crockpot.
Rinse and dry raw roast, sprinkle with salt, pepper and garlic powder on all sides. Place in the crockpot.
Pour Liquid smoke on top of the meat
Pour water in crockpot.
Cook on LOW for 12-14 hours.


Remove meat to a large platter.
 Pour juices into a glass dish (once it settles a little you can skim the fat off the top) 
Remove bone from the meat. Trim any visible fat off meat.
Shred meat up and put back in the crockpot to keep warm.
Pour the skimmed juice in with the meat. 
Serve with BBQ sauce (we like Sweet Baby Ray's) on buns.


Friday, January 20, 2012

More New Classes Debuting this Open House

"Gone Fishing" with Kathy Ryan

"Labyrinth" also with Kathy Ryan

Carolyn Bisbee is teaching this beautiful paper pieced pattern by Judy Niemeyer (above) and the quilt below called Arizona Sunset:
 
Mandy Stokes is teaching the Let's Twist tablerunner below:
Come to open house to see these and many more class samples on Saturday January 21 and take advantage of our 25% off sale!
Or for a complete print out see our classes page on our website www.quilterscrossingtx.com 
See you soon!

Thursday, January 19, 2012

Nature Walk and OPEN HOUSE

Okay we are gearing up for the January 21st Open House this Saturday! New classes like these for example:
In the Hoop quilting and embroidery by Lynn Blake
Make a Trivet with Venetta Morger
"Firecracker" with Mandy Stokes
  And that isn't even all of the new classes available! 
It is going to be a great day with lots of goodies given away, yummy refreshments and did I mention a great sale? 
(25% off store wide). 
Tri-County Quilt Guild will have their raffle quilt at the shop so bring some cash to buy a chance to win this beautiful quilt!!
***********************************
This just in from our pals at Northcott- Nature Walk


We have had a lot of nibbles about the challenge issued in the January 1st Blog post called "Pick a Card, Any Card". 
There is plenty of time to enter since the last day to turn them in is March 31st! Two chances to win a $50 gift card this time!
See everyone on Saturday!

Tuesday, January 17, 2012

All last year, Quilters Crossing hosted the Circle of Friends block of the month with fabrics from Marcus Brothers in its Aunt Grace line. This is a lovely line of 30's reproductions. Last week we had our first person with a finished quilt! 
Here is Denise's Circle of Friends :
The Center Medallion:
Details: This quilt measured 82"x82" and has wool batting, it was custom quilted at Quilters Crossing.
Baskets filled with feathers:
 Corner shot of the borders:
She did a great job and it was fun to see it completed! Thank you for allowing us to share it on the blog Denise! 
This quilt is entered in Tri-County Quilt Guild's show at the Berry Center in March so you can all see it in person then!

Tuesday, January 10, 2012

Coffee fabric

It is no secret that Deb, Nancy and I love coffee. 
Deb is especially fond of Folgers but we haven't found any Folgers fabric yet!
We did however see this coffee themed line that also had cats on the panel and we were sold. ( We all love cats as well!)
This just in from Henry Glass:
 Check it out my favorite coffee drink a Caramel Macchiato is on there!
 Pretty blenders and bold stripes:

Blenders and dots 
 Beautiful rich florals:
I am thinking quilts, purses, trivets, placemats....
Don't forget about our current challenge, Pick a Card, Any Card. The details for it are on the January 1, 2012 blog entry.
Also Open House is January 21- just a little over a week away mark your calendars!
Lots of ladies on retreat this week. We'll miss you and hope you guys have a great time and don't cause too much of a ruckus!

Thursday, January 5, 2012

Design Wall Tutorial

I was with Diane today who is getting ready to open her second Quilters/Crafters retreat next week!! and we were making the design walls for the workroom.   I mentioned how we have had many people ask us about the design walls in the classroom at the shop, and she said,  "You should do a tutorial!" 
So like any good blogger I whipped out my camera and away we went!
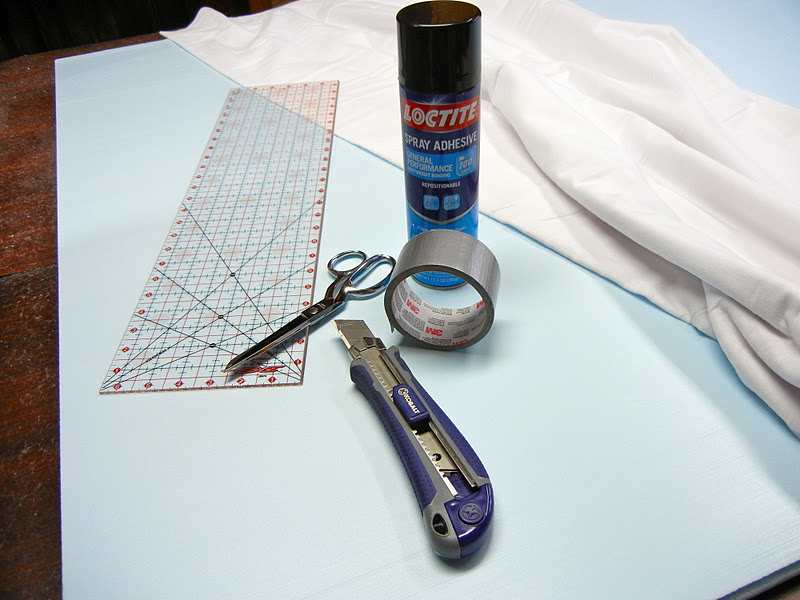
Here is what you need:
A well ventilated room
A friend
A large work surface ( a clean floor would be okay but I like a table--not thing you can't wipe down because glue and flannel bits get everywhere on it and make a mess--DO NOT coat a nice table with newspaper or your pretty white design wall will be dirty!)
6"x24" ruler
Razor*
Duct Tape*
Loctite* or other spray on glue/adhesive suitable for multiple surfaces including fabric!
Nice pair of scissors
108" flannel (available at Quilters Crossing)
1 4'x8' sheet of residential insulation board or styrofoam board* 
(*the spray glue, duct tape, razor and insulation board are found at a local home improvement store)

First you measure the area you want to cover with design wall, if you do not want the whole piece use your ruler and razor to cut the foam board down until it is exactly how big you want it. 
We needed a large design wall so we left it intact.
Next measure out your flannel - with 108" flannel you have plenty of length so you won't have a seam in your design wall. Measure out your width plus add 10-12" extra to wrap around the back so you have a nice finished looking edge.
 (You don't have to cut precisely or neatly here so no need for a rotary unless that is handy)
Next lay your insulation board plain side up on your work surface and cover it with your flannel making sure there are a few inches all around extra.
Now fold back one half of the flannel like so and spray on the glue after shaking it well.
Now here is where you really need a friend. You gently smooth the flannel you had folded back, over the now glued tacky area. Keep the loose part held up out of the glue. Starting in the middle and working out towards the sides and end lay the flannel down. Smooth out wrinkles as you lay it down, if you get a ripple or wrinkle just gently pull it up and re-smooth.
Repeat the process on the other end of the foam sheet:
fold back, spray:
Smooth you have this now:
It is nice, smooth and glued down on the foam but loose on the sides. Flip it over:
Now you are going to pull the loose bits to the back side. Start with the corners. Have your handy friend cut pieces of tape for you while you pull it snug like doing hospital corners on a bed- It won't be perfect but you won't see it at all on the front so don't worry.
Hold with your finger then place the duct tape to hold it in place. Be sure to catch a bit of the foam board as well as the fabric. Repeat for the other corners.
 
Using the duct tape put the tape on the edges of the flannel and give a little pull to make sure it is snug and place the tape down on the foam as shown:
(It won't be perfectly even if you cut it really straight because of all the pulling and smoothing when you were on the other side)
So now you have completely taped down the loose edges:
 And when you flip it over....
 it looks like this: perfect and ready to hang!
Use a drill to screw right through these in the four corners wherever you want your design wall. Make sure your screws are 1/2" -1" longer than your design wall is thick so they'll reach the wall. 
(Some styrofoam is pretty thick and
 you'd need really long nails for it)
For a fun touch you can even cover up each of the screw heads with a button like we do at the shop! 
Or maybe you have another idea to personalize yours.
The table will have received some of the glue spray 
(as well as your clothes, skin and hair if you aim like I do!) and then the flannel touches it you get this mess fuzzy sticky residue on your table but will wash off easily with a little soap and water.