Saturday, August 25, 2012

Cake Pop Tutorial

First of all thank you to everyone who came out for our Open House today at the shop. We had a great day and really appreciate your support. After the last open house we published Mandy's husband's Pulled Pork recipe so this time we thought we would show you how we made our Cake pops for this open house!
You will need:
1 cake mix baked as the box directs you:
3/4 of a container of frosting: 
(We chose Lemon flavor to go with our vanilla cake but you can pick as you like.) Wash your hands cause you are going to be playing with your food!
When your cake is completely cool you will break the cake apart in a large mixing bowl. 
The best way is to rub it against itself as shown. 
It falls apart in just the right size crumb for the most part. Make sure you don't have any cake looking bits left
Next mix in 3/4 of a tub of frosting. 
 Mix it with a spoon until it forms a dough:
Now roll it into balls about 1 1/2" in size.  
It helps to re-wash your hands a few times as you make the balls-- they stay smoother that way. Lay them on a parchment paper lined cookie sheet, cover with plastic wrap and refrigerate over night.
(You get between 40 and 50 per cake)
Now to prepare for the dippin'!
We used a piece of styrofoam (from Lowe's)
 cut down to about 15" x 18".
Using a wooden skewer we poked holes about 3 finger widths apart forming a grid ( like the dreaded dot game!)
In the morning....leave your cake balls in the fridge while you prepare your work area and melt your candy. First get your topping out and ready, we used rainbow sprinkles in a small dish:
You will need about 3 lbs of candy melts or chocolate coating to cover your cake pops.  Put the coating in a small deep bowl and melt as directed in the microwave on the package. We used chocolate and white chocolate almond bark together. Here it is starting to melt it is important to stop and stir it frequently while melting it happens quickly!
All the way melted and ready to use:
Take out a few cake pops at a time so they stay cold:
Take one lollipop stick and dip it about an inch into the melted coating and then stick it right in a cake ball, (it helps act like glue):
Then dip the ball into the coating 
 making sure it covers all the way to the stick!
Take it out slowly and let the excess drip off into the bowl. 
As soon as it isn't drippy anymore give it a dunk in the sprinkles:
 Wah-lah!
Stick it in one of your prepared spots on the styrofoam and allow it to harden. 
Repeat for the whole batch!

Tips:
Every 10 dips I had to reheat the coating a quick blast in the microwave ( 15 secs) to keep it loose enough to dip into.
We also made a chocolate cake- for those cake balls we melted minty candy coating wafers and dunked them in crushed peppermint candy.
You could vary the cake flavor and/or the toppings! 
Don't color your candy coating with regular food coloring- you have to use oil based/candy coloring or buy the candy coating already tinted. It is sold in the Wilton/Baking aisle at Hobby Lobby or at Joann's and in some grocery stores.
Have fun and enjoy!


Thursday, August 23, 2012

Open House and more news!

Just a reminder that our open house is Saturday from 9:30-2:30 and the store will be open until 4:30pm. It is traditionally very busy before 1 pm and then things settle down a bit, if you are looking to time your outing for thinner crowds.
Open house is the day when all our teachers are invited to come in with their samples and show off the classes they are offering at our shop in the coming months. It's like a quilt show out there in the classroom and we have refreshments and snacks too!
 In the shop there is a store wide 25% off sale- fabrics(1/2 yard cuts or more), precut fabrics, notions, thread, and patterns! 
********************************************
Quilt Across Texas starts on September 1st. 
This is a teaser - Deb made this Mondo bag from the Quilt Across Texas Jellyroll we'll have for sale starting September 1st. If you are interested in this bag, Dolores is also offering it as a class!
****************************************
The pincushion swap has been receiving some interest and you still have 3 weeks to turn yours in! 
By Rhonda
By Rhonda
We have two turned in already! (see the pictures above) Rhonda used her embroidery machine for these and they are both nice and heavy filled--with ground walnut shells and made of wool.  We now have ground walnut shells available at the shop.

I also noted, around the store, we have several patterns for pincushions if you are someone who prefers to follow a pattern rather than invent one yourself! Check these out:


Or look online! Tons of tutorials, ideas etc... Mandy even has a whole board devoted to pincushions on Pinterest! You can link to Deb's and see what she is pinning too! 

Saturday, August 18, 2012

Quilt Across TEXAS

Shop hop starts September 1st!
Check out the table runner Nancy designed and made out of the QAT charm pack! 
It's a Texas Twister!

We'll be kitting this up and have it for sale as of September 1st! 
Check out the Quilt Across Texas apps available for many smart phone versions new this year and the facebook page! 
Got your passport yet????

Sunday, August 12, 2012

Reversible Table Runner Class

This is one of our teachers Margaret working on her next Jellyroll Sampler which she teaches at the shop. 
 She was in the classroom this week with these fine ladies teaching the Reversible Tablerunner. Here are some shots of her students and their beautiful products:


 She got hers completed and went to work on a second one!
 Halloween themed:


 And Wednesday September 5th we are pleased to host the Tri-County Quilt Guild's workshop taught by Nova Montgomery called "Petal Pushers". We have the sample in the shop now which features adorable dimesional flowers:
Spaces are still available for this class call the shop to sign up!

Friday, August 3, 2012

New patterns!

These first two are made by Anna Maria Horner. The Multi-Tasker Tote can be made from a variety of fabrics including laminated cottons:
  We also have a pattern for this cute sundress with several variations in length and style:
This one is from Atkinson Designs, and we even tested this when we saw it could also be used as...... 
 a wine tote! ( or a lunch bag :-))
 Made using laminated cottons and holds 2 of your favorite wines
 And a bottle opener too!
Hostess gifts anyone? I think more of these are in my future!

Snow Day Batiks

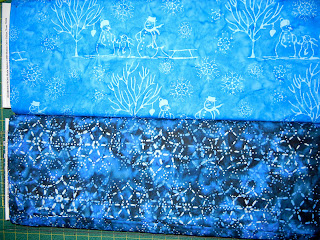
 Many of our customers are very excited about Edyta Sitar's block of the month called Spring Bouquet arriving in September. In the meantime, you can peruse her Christmas batik line Snow Day! We have the whole collection, including a pattern and Jellyrolls!
 
 Mittens!
 Snowmen and snowflakes
 Trees


 Small scale blenders


The pattern has all directions for all three projects in it.

Wednesday, August 1, 2012

Red River, Batiks, and a project idea.

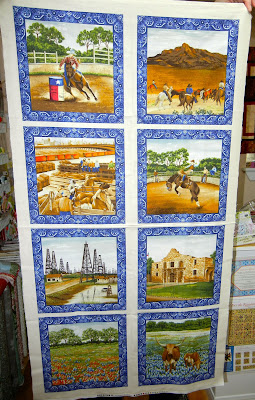
We received some Western/Texas fabrics this week from a line called Red River:
 Here is the panel which has already been a good seller!
The coordinates:

********************************************
We also received some new Batiks from Batik Textiles- lots of lights to support our growing population of Judy Niemeyer pattern users!
And, also from Batik Textiles we are now offering these batik covered gift boxed bundles full of half yard batik cuts in various color ways!
************************************************
Customer Kathryn A. shared this project with us, she bought our flannel Holiday panel and some 1/2 yard cuts of the coordinating flannels. She used them to piece these cute log cabin blocks with a panel square in the center:
Isn't that an adorable way to use a panel? 
Once she makes the other blocks she can set these together any of the many ways a log cabin block can be set- lots of choices! Great job Kathryn, thanks for sharing.