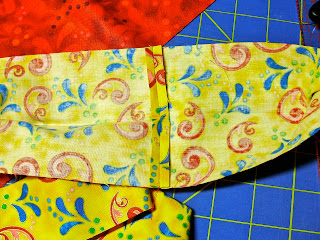
First calculate the length of ruffle you'll need. Generally if you double this length it will give you a decent ruffle. For my project I measured the perimeter of my pillow ( add up the length of all four sides). Then I doubled this number. My pillow measured 68" around so I needed 136" of fabric for the ruffle.
Next determine the height you want your ruffle to be. I actually want to do a double ruffle one slightly shorter than the other. I want my shorter ruffle to be about 1.5" tall. So I take 1.5" and double it ( now we have 3") and add 1" for seam allowance so I make my cuts 4" each. Three cuts 4"x WOF will give me 132 inches approximately which is close enough for me to my target 136" so I am going with that.
My second border needs to be a bit taller (2.5" tall) so I cut 3 -six inch strips X WOF to achieve this ( this works out to exactly 1/2 a yard of fabric for this outer border). I point this out because it is very easy to underestimate the amount of fabric you'll need for a ruffle when purchasing it.
Sew your shorter ruffle strips together end to end with a 1/4" seam allowance ( Wrong Sides Together).
Next turn your ends under and topstitch to finish the ends cleanly. You can also sew the ends together and have a circle which gives a nice look but you need to be very careful not to twist it! Next fold your ruffle in half all along its length as shown. Press. Repeat with taller ruffle fabric if you are doing a double ruffle!
Okay now for the nifty trick:
You going to sew a stretched out zig zag stitch down the length of your ruffle on the raw edge side. Set your zigzag stitch as long and wide as it goes on a normal sewing machine. (People with embroidery machines won't go to their maximums just enough for the next part)
The tricky part is that you stitch the zig zag over a string of pearl cotton or a piece of dental floss! This is what you will do the gathering on-- much stronger-- less breakage! I did the zig zag inside of the basting so you could easily see it but you could zig zag right over the basting stitches. Note the string of black pearl cotton under the zig zag here.
Now if you feel like you need three hands to do this, don't worry! You can stitch the zig zag and then go back with a big huge needle and run the floss or pearl cotton through the zig zag channel! Either way is fine.
Now you are ready to gather your ruffle to the desired length confidently- knowing that your gathering string will not snap and make you have to start all over again! Just make sure you hold onto both ends of the floss or cotton as you gather or it will slip right on through OR as my problem solving husband suggested- temporarily tie a button on each end of the floss so it can't slip all the way through!
When you reach your target length of ruffle (mine was 68" remember) make a large knot at each end so the length won't stretch out again or you can tie the ends together if you are going all around something with the ruffle. Even out the fullness of your ruffle to your preferred look.
Pin raw edges together to your pillow front. I wanted the yellow border to be in front since it is shorter so I had to lay it face down on the pillow front. Pin generously making sure to overlap your start and finish about an inch if you didn't make the ruffle in a circle.
Straight stitch all around (make sure you change your stitch length to normal not basting!) Use the zig zags tips as your guide- you want to stitch just to the inside of the zig zags so they will not show on the finished pillow. It will be bumpy sewing over all the ruffles but if you have pinned well you'll be okay. Watch your corners- make sure you don't have any of the ruffle tucked in the seam where it shouldn't be. Remove the floss/pearl cotton (and buttons) by cutting the string and pulling through.
This particular pillow and ruffle are made from Jane Spolar's line called Bliss put out by Northcott fabrics and available at Quilters Crossing in Tomball! I hope this tutorial inspires you to add some ruffles to a project in your future!


This is so cute! You have really explained and shown the how-to's in such good detail! Bravo!
ReplyDeleteWhat a great ruffle technique. Thanks for the demo.
ReplyDelete