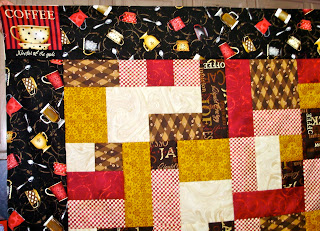
I used the Atkinson pattern called "Yellow Brick Road". As I was cutting fabric for the borders the pattern says you can use the blocks to put cornerstones in the border but.... I had this panel:
which I was going to use on the back with some other pieces from the line and I thought- what if I used some of those squares for the cornerstones in the border? And wouldn't you know it? Serendipity struck because they were exactly the size the pattern called for the border to be! How cool is that?
So wah-lah.
But when I had fussy cut those square out of the panel, I had cut carefully around all these cute little coffee cups. It was too much to throw away but what to do with them?
Fabric collage
What you need:Modge Podge gloss coat (hit Hobby Lobby for this)
a paint brush
scissors
scraps of fabric
a fat quarter for the background
one stretched canvas 12" x 12"( Hobby Lobby or Jerry's Artarama for this)- the kind where the canvas is wrapped and stapled tightly around 4 wood pieces.
Stapler
Step #1.
First you cut your background fabric to be about 16 x 16" and put your canvas face down on the wrong side of the fabric in the center. Wrap the fabric up around to the back and staple it in place-- the wood on these is really soft so your staples will go through. Staple in several places on each side.
Pull it snug but there is no need to stretch it super tight. Fold your corners neatly-- everyone is well practiced at this after wrapping all those Christmas presents last week!
Flip and check your work.
Step #2.
Fussy cut some images you want to collage. I cut out coffee cups, spoons and also had some long strips left from the quilt I grabbed too. Cut out more than you'll need so you have some to play with.
Step #3.
Audition arrangements on your background. Move them around add some/take some away etc... Take pictures as you go so you can keep playing without losing the layouts you like.
Pick your favorite from your pictures. Now remove all of them from the background. Here is where you have to work a bit fast.
Step #4.
Cover your whole blank background generously with modge podge.
Don't worry it will dry completely clear!
Now using your favorite camera image place the first layer of fabrics and modge podge over them. If you don't place them perfectly just lift them and replace them. Go heavy on coating them with the modge podge once you have them where you want them. You want it to really soak through the fabrics.
Now do the next layer and coat them as well.
And I had one more layer to add the spoon in the tall cup!
Make sure everything is well coated with the modge podge once more and then do the edges. You'll have to prop it up from underneath so it dries without sticking to your table! I used some empty spools of thread under the wood in the four corners.
Then we wait for it to dry overnight. This is the hard part because I can't wait to see it done!
So now I have a neat piece of art I made for the wall and a quilt that matches it!
The Modge Podge hardens and dries clear with a glossy finish.
To celebrate lets make the magic word "Folgers" which happens to be Deb's favorite coffee. Mention it at check out and receive a free fat quarter of your choice!


love it!!
ReplyDeleteCoffee is the best - I love your homage!! Happy New Year!
ReplyDelete